


Techniques for Using Teaching and Other Materials
- Techniques for Using Voice Files
-
It is very important for technical intern trainees who are immediately starting work at a business in Japan to get used to hearing and being able to understand voices in Japanese. At the same time, it is extremely difficult to secure opportunities to hear voices in Japanese outside Japan.
In light of this circumstance, JITCO Japanese Teaching Materials ひろば, and particularly its main textbook みどり: Japanese for Technical Intern Trainees (hereinafter referred to as "みどり"), incorporate many voice files, as they are designed for classes where students’ study is accompanied by active listening to voices in Japanese.
To do this requires downloading みどり voice files from this website and then preparing equipment for playing those voice files in the classroom, as preparation for classes that use みどり. Please confirm whether you have the required equipment and make the necessary arrangements for each classroom environment by referencing the following.
How do I play the downloaded voice files in the classroom?
You must connect (1) the location of the downloaded voice file with (2) equipment for loud playback in the classroom via (3) cables or similar.
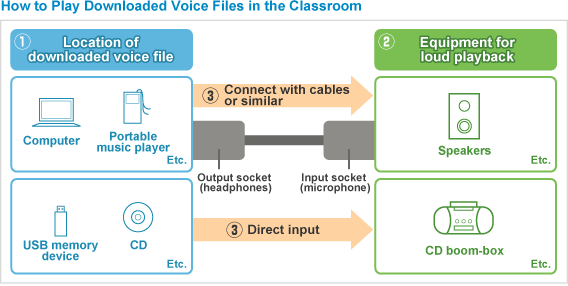
- (1) Location of downloaded voice file
- In all of the following cases, it is convenient to use a device that allows you to check the titles and other details of the downloaded files with text in order to easily select from among multiple files you would like to play.
- Computer
- Portable music player
- USB memory device
- CD (computer voice file copied onto a CD)
To copy voice files from a computer to a CD requires a computer with CD writing capabilities. To check for CD writing capabilities, consult the instruction manual for the computer, or the store where the computer was purchased.
- (2) Equipment for loud playback in the classroom
-
- Speakers
- CD boom-box
- (3) Cables or similar
-
- If (1) is a computer or portable music player, you will need a cable for connection. Use the cable to connect the output socket (headphone jack, etc.) of (1) to the input socket (microphone socket, etc.) of (2).
On the output socket will be written: LINE OUT, SP OUT, or similar.
On the input socket will be written: LINE IN, MIC, AUX, or similar. - If (1) is a CD, you can play it like a music CD by placing it in the CD boom-box.
- Some CD boom-boxes also come equipped with USB ports, which enable you to play the files by inserting a USB memory device into the CD boom-box.
- If (1) is a computer or portable music player, you will need a cable for connection. Use the cable to connect the output socket (headphone jack, etc.) of (1) to the input socket (microphone socket, etc.) of (2).
Techniques for Using Images (Illustrations, Photos, etc.)
Although the images provided at Teaching Materials ひろば are sized so that they will fit onto A4 paper without adjustments when printed, you can also change the size of the images by pasting them into Microsoft Word or other utility software.
- Copy the image and paste it into Word (this example is based on Microsoft Word)
- Have a Word file open before starting.
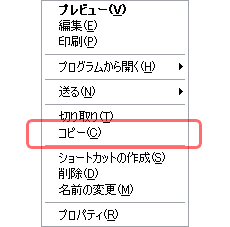
Right-click on the image you would like to copy
=> Select "Copy" and left-click
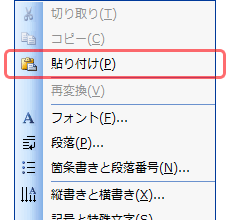
=> Move the cursor to the Word file and right-click
=> Select "Paste" and left-click
- Move an image pasted into Word to a desired position on the page
- To move an image to your preferred location in Word, modify "Graphical Elements Formatting."
Right-click on the image
=> Select "Graphical Elements Formatting" and click

=> Select the "Layout" tab and click

- Select "Square" or "Surround" and click
(If the pasted image is square, selecting either will have the same effect.)
If there is text entered near the image, the text will be arranged around the perimeter of the image. - Select "Foreground" and click
If there is text entered near the image, the image with be superimposed on the text, and the text will be hidden. - Select "In-line" and click
If there is text entered near the image, one image will be treated as one text character, affecting the space between lines of text. - Select "Background" and click
If there is text entered near the image, the text will be superimposed on top of the image, as if the image were in the background.
=> Click "OK"
- Select "Square" or "Surround" and click
- Change the size of an image pasted into Word
- Left-click on the image => Small white circles will appear on the corners of the image
=> When the white circles are present, moving the cursor over one of them will bring up a diagonal <=>
=> While clicking (holding down the mouse button; the <=> mark will disappear), you can expand or shrink the image to your preferred size by moving the mouse diagonally.
Large images: You can use these for teaching materials to show the whole class.
Small images: You can copy these into the handouts you make with Word.
Moving the mouse while clicking on the image allows you to move the image to your preferred location.